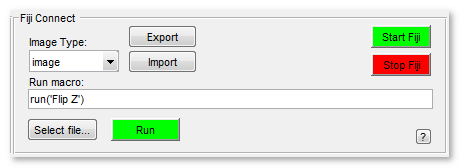
Fiji Connect Panel
The Fiji Connect Panel is a feature that allows communication with Fiji, an image processing software. To use the Fiji Connect Panel, you need to have Fiji installed on your system. The Fiji Connect Panel utilizes a Java package called MIJ for bi-directional communication and data exchange between MATLAB and ImageJ/Fiji.
MIJ was developed by Daniel Sage, Dimiter Prodanov, Jean-Yves Tinevez, and Johannes Schindelin. It is important to ensure that the MIJ package is integrated into your Fiji installation for the Fiji Connect Panel to function properly. Please refer to the System Requirements section for details.
Back to Index --> User Guide --> Panels
Contents
-
Video tutorial -
1. The Start Fiji button -
2. The Stop Fiji button -
3. The Image Type ▼ dropdown -
4. The Export button -
5. The Import button -
6. The Run macro edit box -
7. The Select file... button -
8. The Run button -
9. The Help button -
Example: Finding Edges using Fiji
Video tutorial
Detailed demonstration on data exchange between MIB and Fiji can be seen
in a video tutorial:
 Visualization of datasets and models using Fiji
1. The Start Fiji button
The Start Fiji button is used to start an instance of Fiji from MATLAB. It is necessary to start Fiji from MATLAB in order for communication between MATLAB and Fiji to work. Before performing any other actions, press this button to start Fiji!
2. The Stop Fiji button
The Stop Fiji button is used to stop Fiji after you have finished your work. Press this button at the end of your Fiji usage to properly close Fiji
3. The Image Type ▼ dropdown
The Image Type ▼ dropdown allows you to define the type of layer that should be exchanged with Fiji. For example, if you select the Image ▼ entry in this menu, you can send the currently opened image to Fiji by pressing the Export button. This dropdown allows you to specify the type of data you want to exchange with Fiji.
For more details on how to use this feature, you can refer to the section titled Finding Edges using Fiji below.
4. The Export button
The Export button is used to send the currently opened dataset (Image, Model, Mask, Selection) to Fiji. The specific type of dataset that is sent depends on the settings in the Image Type ▼ dropdown. Pressing Export will transfer the selected dataset to Fiji for further processing or analysis
5. The Import button
The Import button allows you to transfer datasets from Fiji to MIB. You can import datasets to the Image, Model, Mask, or Selection layers. The destination for the imported dataset can be set using the Image Type ▼ dropdown. It is important to ensure that the size of the Model, Mask, and Selection layers match the size of the Image layer that is opened in MIB.
6. The Run macro edit box
The Run macro edit box allows you to run a macro on Fiji. You can type a macro command into this edit box. By default, a template for the command is shown in the edit box. For example, the command "run('Flip Z')" will flip the Z-dimension of the selected dataset in Fiji. Press the Run button to execute the macro command.
You can obtain the syntax for the macro command from the corresponding reference page of Miji. Additionally, you can provide a list of macros in a filename in text format. In this case, enter the path to the file into the Run macro edit box or use the Select file... button to choose the file.
7. The Select file... button
The Select file... button allows you to choose a file that contains a list of macro commands to use with Fiji. Pressing this button opens a file selection dialog where you can browse and select the desired file. This file can contain multiple macro commands that will be executed when you press the Run button.
You can obtain the syntax for the macro command from the corresponding reference page of Miji
8. The Run button
The Run button is used to execute a macro written in the Run macro edit box. If the edit box contains a path to a text file with a set of macros, the Run button will load that file and execute all the macros written in that script file. Pressing this button triggers the execution of the macro commands and performs the desired actions in Fiji.
9. The Help button
The Help button provides access to the help page. Clicking on this button will open the help documentation, where you can find detailed information and instructions on how to use the various features and functions of the software
Example: Finding Edges using Fiji
This example demonstrates how to use the Fiji software to find edges in a 3D grayscale dataset and generate a binary mask from them.
Assuming that Fiji is installed and configured correctly, you can follow these steps
- The test dataset can be obtained from Menu->File->Example datasets->SBEM->Huh7 and model
- Open a dataset for tests
- Press Start Fiji to open an instance of Fiji
- If you want to send the opened image to Fiji, select
imagein the Image Type ▼ dropdown and press the Export button - In a appearing dialog enter name for the dataset to be used in Fiji
- Find edges: Fiji->Menu->Process->Find Edges
- Generate binary image from the edges: Fiji->Menu->Image->Adjust->Auto Threshold, set the
MethodtoMean, and check the [✓] Stack check box. Press OK to do thresholding - In
MIBselect Fiji Connect->Image Type->mask and press the Import button - Now
MIBshould have a newMasklayer imported from Fiji
Back to Index --> User Guide --> Panels