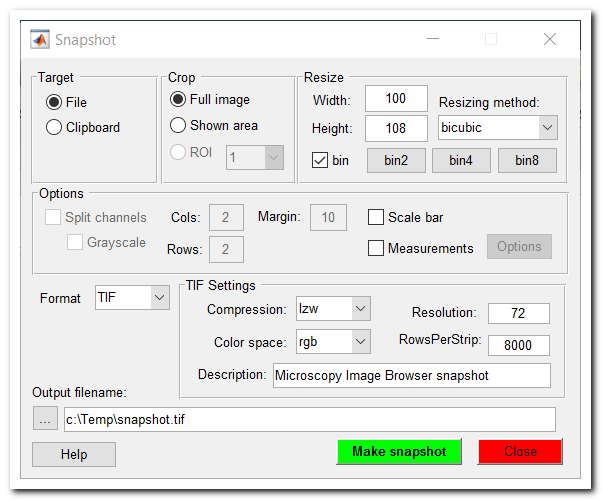
Make a snapshot to a file or to clipboard.
This dialog provides access to different settings for making snapshots.
Back to Index --> User Guide --> Menu --> File Menu
Contents
-
Target -
Crop -
Resize -
Options -
Format

Target
Define the destination for the rendered snapshot. The snapshot may be saved to a file when the File option is selected, or copied to the system clipboard, when the Clipboard options is selected.
Crop
- Full image - make snapshot of the whole image
- Shown area - make snapshot of the displayed in the Image View panel area only
- ROI - use selected ROI (the ROI may be defined using the ROI panel ) as area for the snapshot
Resize
-
Width - modifies width of the snapshot, or the width of a single panel when the
Split channelmode is enabled -
Height - modifies height of the snapshot, or the height of a single panel when the
Split channelmode is enabled - Resizing method - select one of possible resizing methods
List of image resizing methods
- nearest - Nearest-neighbor interpolation; the output pixel is assignedthe value of the pixel that the point falls within. No other pixels are considered; best for upsampling of the images.
- bilinear - Bilinear interpolation; the output pixel value is a weighted average of pixels in the nearest 2-by-2 neighborhood.
- bicubic - Bicubic interpolation; the output pixelvalue is a weighted average of pixels in the nearest 4-by-4 neighborhood; best for downsampling of the images.
The [✓] bin checkbox defines actions for the bin2, bin4, and bin8 buttons. When the [✓] bin checkbox is selected the bin buttons reduce size of the image, otherwise the buttons change their names to mag2, mag4, and mag8 and increase the image size.
- bin2/mag2 update the dimensions of the snapshot after decreasing/increasing the image size in 2 times
- bin4/mag4 update the dimensions of the snapshot after decreasing/increasing the image size in 4 times
- bin8/mag4 update the dimensions of the snapshot after decreasing/increasing the image size in 8 times
Options
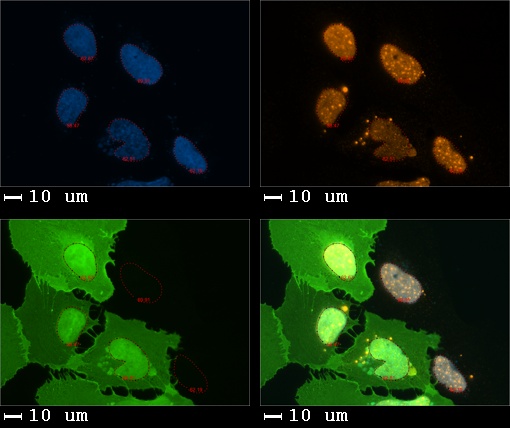
Split channel - generate a montage image, where each panel has only one color channel.
The dimensions of the montage image can be specified using the Cols (number of horizontal panels) and Rows (number of vertical panels) edit boxes. In addition, it is possible to force rendering of individual color channels in the grayscale mode (the Grayscale check box).
Split channel example

- white Bg - render background in white color for the split channel mode and the scale bars
-
Scale bar - select the
Scale barcheck box to add a scale bar to the snapshot. Note! if the width of the snapshot is too small the scale bar is not generated - Measurements - add the displayed measurements to the snapshot. Warning! The resulting image may have border artifacts, at least in MATLAB R2014b. The snapshot is done using the export_fig function written by Oliver Woodford and Yair Altman
- Options - define visualization options for the measurements
Format
Select one of the possible formats. There are number of format specific settings available for each image format.
- BMP - Windows Bitmap (BMP); 1-bit, 8-bit, and 24-bit uncompressed images.
- JPG - Joint Photographic Experts Group (JPEG), 8-bit, 12-bit, and 16-bit Baseline JPEG images.
- PNG - Portable Network Graphics (PNG) format
- TIF - Baseline Tagged Image File Format images, including 1-bit, 8-bit, 16-bit, and 24-bit uncompressed images.
Back to Index --> User Guide --> Menu --> File Menu