Image View Panel
The Image View Panel is a component that displays slices of the opened dataset. The slices can be in the XY, ZX, or ZY dimension, depending on the selected mode in the Toolbar. The panel provides a slider and an edit box on the left-hand side, which allow you to change the displayed slices. When the opened dataset has only a single slice, the slider and the edit box are not displayed.
Back to Index --> User Guide --> Panels
Contents
-
List of possible image layers that may be simultaneously shown in MIB: -
Mouse actions -
Key actions -
Drag and drop files -
Extra parameters for the change slices slider.
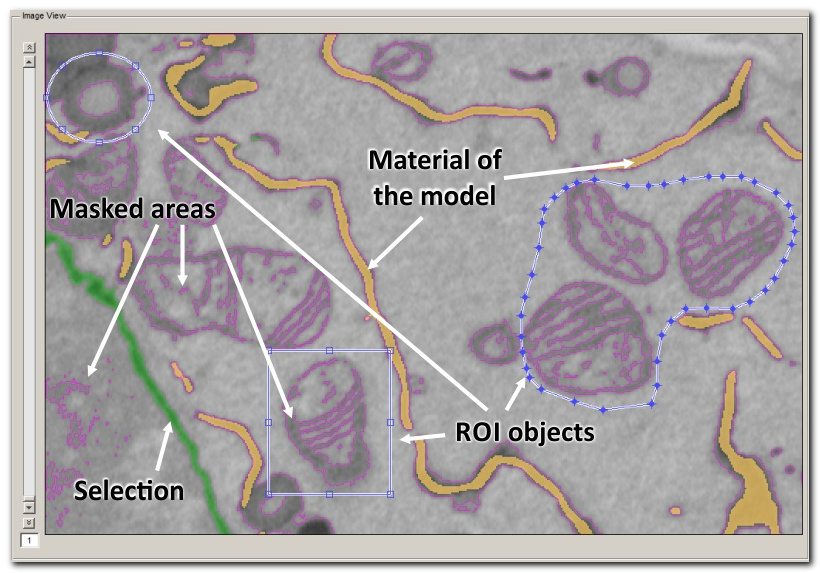
List of possible image layers that may be simultaneously shown in MIB:

- Grayscale or multi-channel image, this layer displays the original grayscale or multi-channel image that is being analyzed
- Model layer, the model layer contains information about the materials of the segmented model or a difference map for correlation analysis (click to see more about the image layers)
- Mask layer, mask layer is a black and white (bitmap) mask that is generated by some of the filters. The mask is a service layer that may be used as a source of shapes for segmentation or as an area for local black-and-white thresholding with the BW Thresholding tool.
- Selection layer is a temporary layer used for segmentation. It can be easily modified and is eventually sent to the Mask or Model layers for further analysis
- ROI layer, if Regions of Interest (ROIs) are enabled, they can also be seen in the Image View panel. ROIs allow for the selection and analysis of specific regions within the image.

Additionally, the colors and transparencies of the Model, Mask, and Selection layers can be individually adjusted using the sliders in the View Settings panel and in the Preferences dialog (Menu->File->Preferences->Colors). This allows for customization of the visual representation of these layers
Mouse actions
The Image View Panel allows for various mouse actions to interact with the displayed image. Here are some common mouse actions and their functionalities:
- move mouse, by moving the mouse around the image, you can see pixel information and coordinates in the Path Panel. This provides details about the specific location of the cursor within the image
left mouse click, clicking the left mouse button enables the selection of pixels in the image based on a specified method in the Segmentation Panel. This allows for the identification and marking of specific areas of interest
right mouse click + move mouse, holding down the right mouse button and moving the mouse activates the pan mode. This allows you to move the image left/right and up/down, providing a way to navigate and explore different parts of the image
- ^ Ctrl +
left mouse click, holding down the ^ Ctrl key while clicking the left mouse button removes the selection from the existing selection (i.e. the eraser mode). This is helpful for deselecting specific areas or refining the selection
- ^ Ctrl + mouse wheel (Ctrl + Shift + mouse wheel), changes the size of the brush and other selection tools. This allows for adjusting the size of the selection tool to suit the specific requirements
- Mouse wheel, scrolling the mouse wheel up or down can perform different actions depending on the settings in the Preferences dialog. It can change slices, allowing you to navigate through different slices of a 3D image, or zoom in and out of the image for a closer or wider view
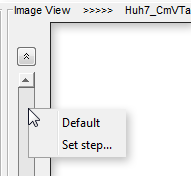
- ⇧ Shift + Mouse wheel, holding down ⇧ Shift while scrolling the mouse wheel jumps to 10 slices at a time. The number of slices can be defined from a popup menu that appears during a right mouse click above the slices slider in the Image View Panel. This provides a faster way to navigate through multiple slices
Right mouse click opens a dropdown menu
When clicking on an empty area of within this panel an additiona menu appears allowing to hide/show the following panels. This allows to increase space occupied by the Image view panel

Key actions
- W key, zoom in to the area under the cursor
- Q key, zoom out away from the area under the cursor
- mouse wheel, ⇧ Shift + mouse wheel show next/previous slice
- ⇧ Shift + mouse wheel jump 10 slices forward/back (to change this step, see below)
- ↑ up, show next slice
- ↓ down, show previous slice
- right → , show next time point
- left ← , show previous time point
Key shortcuts can be reassigned in Menu-File->Preferences->Keyboard shortcuts>
For full list of key shortcut consult with List of key and mouse shortcuts .
Drag and drop files
- Images, image files can be loaded by selecting them in a file explorer and drag and drop them into the Image View panel.
- Models, model files with the *.model extension can also be drag-and-dropped to this panel to be loaded as a new model. When model files with labels have other extensions, they also can be drag-and-dropped into MIB for loading, but the destination should be the Segmentation table in the Segmentation panel.
- Masks, mask files with the *.mask extension can be automatically loaded by drag-and-drop them into the Image view panel.
- Annotations, annotation files *.ann files can be automatically loaded by drag-and-drop them into the Image view panel.
Extra parameters for the change slices slider.
This slider is only shown when 3D or 4D datasets are loaded. By default, each iteration of the mouse wheel changes the shown image by 1. It is possible to modify this. Press the right mouse button on the slider to set the desired step.

Back to Index --> User Guide --> Panels