The View Settings Panel
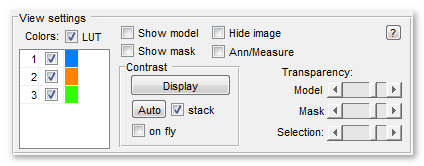
The View Settings panel gives basic tools for visualization of the dataset.
Back to Index --> User Guide --> Panels
Contents
-
1. The Colors table and the [✓] LUT checkbox -
2. The Show Model check box -
3. The Show Mask check box -
4. The Hide image check box -
5. The Annotations check box -
6. Display -
7. The Auto button and checkboxes -
8. The Transparency sliders -
Right mouse click opens a dropdown menu

1. The Colors table and the [✓] LUT checkbox
This table contains a list of color channels of the dataset. The color channels may be switched on and off (a combination of Ctrl+left mouse click above checkboxes turns on selection of a single color channel). The image is generated depending on selection state of the LUT checkbox. When the [✓] LUT checkbox is selected MIB generates the final image based on defined colors (the third column in this table). Note! When the [✓] LUT checkbox is unchecked the maximal number of colors that can be shown simultaneously is limited to 3. If more than 3 colors are selected then only the first 3 color channels are shown.
A brief demonstration of work with color channels is available in the following video:
 https://youtu.be/gT-c8TiLcuY
The right mouse button gives access to additional color channel actions
- Insert empty channel..., insert an empty channel (intensity of all pixels is 0) to the specified position
- Copy channel, to copy the selected color channel to a new channel (available also from Menu-Image-Color Channels)
- Invert channel, to invert the selected color channel (available also from Menu-Image-Color Channels)
- Rotate channel, rotate the specified color channel (available also from Menu-Image-Color Channels)
- Shift channel, allows to shift a channel by X and Y pixels (available also from Menu-Image-Color Channels)
- Swap channels, to swap the selected color channel with another one (available also from Menu-Image-Color Channels)
- Delete channel, to delete the selected color channel (available also from Menu-Image-Color Channels)
- Set LUT color, to set colors for use with the [✓] LUT checkbox (available also from Menu-File-Preferences)
2. The Show Model check box
Switch on/off the Model layer. This check box has a shortcut space.
3. The Show Mask check box
Switch on/off Mask layer. This check box has a shortcut Ctrl + space.
4. The Hide image check box
Switch on/off display of the Image layer.
5. The Annotations check box
Switch on/off Annotation layer and measurements.
6. Display
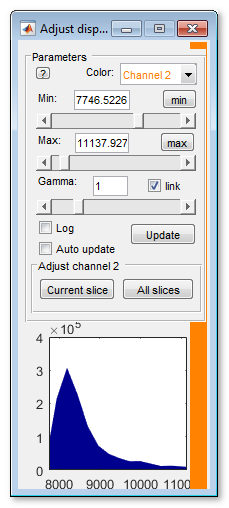
Press to start display adjustments GUI tool, see more here.

7. The Auto button and checkboxes
The Auto button Auto brightness adjustment of complete dataset. The function asks for saturation parameters for both low and high intensity borders. As a result, the image intensities are recalculated to increase the contrast. Note, the function behaviour is affected by the stack switch. When the stack switch is off the brightness is individually adjusted for each frame of the dataset. Alternatively, when checked, the function first finds minimal and maximal stretching parameters for the whole dataset and then uses these values to adjust the contrast.
The [✓] *on fly checkbox automatically adjust contrast for each shown image without recalculation of intensities of the actual data.
8. The Transparency sliders
-
The top trasparency slider regulates transparency of the
Modellayer from opaque (slider in the left position) to transparent (slider in the right position). -
The middle transparency slider changes transparency values for the
Masklayers from opaque to transparent. -
The lower trasparency slider change transparency values for the
Selectionlayer from opaque to transparent.
Right mouse click opens a dropdown menu
When clicking on an empty area of within this panel an additiona menu appears allowing to hide/show the following panels. This allows to increase space occupied by the Image view panel

Back to Index --> User Guide --> Panels