Segmentation Panel
The segmentation panel is the main panel used for segmentation. It allows creating models, modifying materials and selecting different segmentation tools.
Back to Index --> User Guide --> Panels
Contents
-
What are the Models -
The Create button -
The Load button -
The +, -, >|, Squeeze, Recolor buttons -
The Filled/Contour ▼ dropdown -
The Segmentation table -
The [✓] Fix selection to material checkbox -
The [✓] Masked area checkbox -
The [✓] "D" checkbox, to select fast access tools -
The Segmentation tools ▼ dropdown
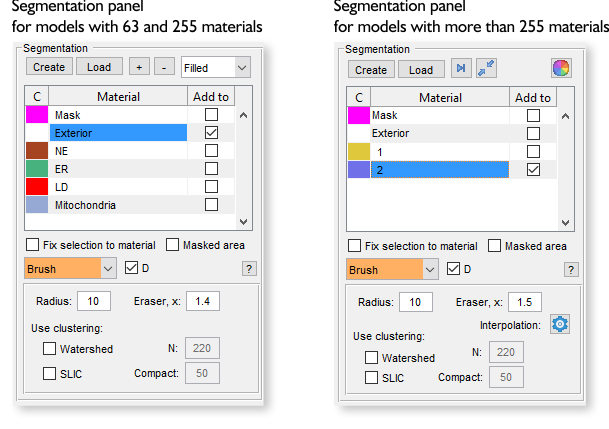
What are the Models
A model is a matrix with dimensions equal to those of the opened Image dataset , i.e., [1:imageHeight, 1:imageWidth, 1:imageThickness]. The model consists of materials, and each element of the model matrix can belong only to a single material or to an exterior. Therefore, it is not possible to have several materials above the same pixel of the image overlapping each other. Each material in the model matrix is encoded with its own index.
Example of a model 4x4 pixels
Model = [1 1 0 0; 1 1 0 0; 0 0 2 2; 0 0 2 2];
Model
Model =

     1     1     0     0
     1     1     0     0
     0     0     2     2
     0     0     2     2
In this example, the shown matrix represents a Model with 2 materials encrypted with 1 (the upper left corner) and 2 (the lower right corner) for the Image of 4x4 pixels. Index 0 encodes background (Exterior)
The Create button
The Create button is used to start a new model. When this button is clicked, the existing Model layer will be removed.
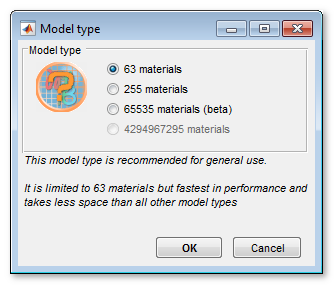
Whenever is possible is is recommended to use models with 63 materials.
If you need to work with materials that exceed 255, you can find a short introduction about this topic in the following video:
 MIB 2.1: compatible with models with more than 255 materials
(https://youtu.be/r3lpmWyvrJU)
For more information about the different types of models, you can visit the Menu->Models page
The Load button
The Load button is used to load a model from the disk. The following formats are accepted:
- MATLAB (*.MAT), this is the default and recommended format
- Amira Mesh binary (*.AM); for models saved in Amira format
- Hierarchial Data Format (*.H5); for data exchange with Ilastik
- Medical Research Concil format (*.MRC); for data exchange with IMOD
- NRRD format (*.NRRD); for models saved in 3D slicer format
- TIF format (*.TIF);
- Hierarchial Data Format with XML header (*.XML);
- all standard file formats can be opened when selecting All files(.)
Alternatively, you can also use the Menu-Models->Load model> option or directly drag-and-drop *.model file to the Image View panel or the Segmentation table.
The +, -, >|, Squeeze, Recolor buttons
- the + button, press to add a new material to the model (only for models with 63 and 255 materials)
- the - button, press to delete the selected material(s) from the model (only for models with 63 and 255 materials)
- the
 button, press to find and select the next empty index in the model (only for models with more than 255 materials)
 - the
 button, press to squeeze the model - remove all empty indices and select
next available empty index (only for models with more than 255 materials)
 - the
 button, press to regenerate colors of materials (only for models with more than 255 materials)
The Filled/Contour ▼ dropdown
This dropdown modifies visualization of materials in the Image View panel.
- Filled - use to draw materials as the filled shapes (faster)
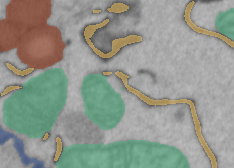
-
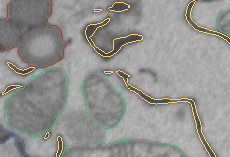
Contour - use to draw only the contours of materials (slower).
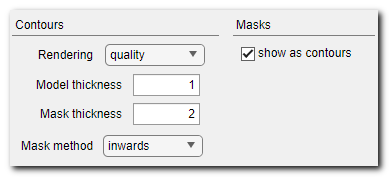
It is also possible to tweak the thickness of the contour lines using settings in Menu->File->Preferences->Colors and styles->Contours
The Segmentation table
The Segmentation table displays the list of materials in the model.
A brief demonstration of the Segmentation table is available in the following video: MIB in brief: Segmentation Table (https://youtu.be/_iwQI2DIDjk)
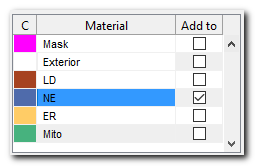
The segmentation table has 3 columns:
- Column "C" this column shows the colors for each material. Clicking on the first column will open a dialog for color selection
- Column "Material" lists all the materials of the model.
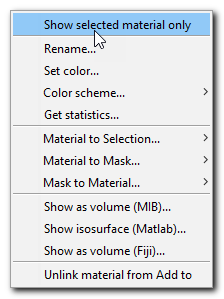
right mouse click on a material in this column will open a context menu with additional options for the selected material
- Show selected material only this is a toggle that switches the visualization of materials in the
panel. When checked, only the selected material is shown - Rename this option allows you to rename the selected material
- Set color this option allows you to change the color for the selected material
- Color scheme this option updates the material colors using a list of predefined color palettes. More tools to work with the palettes are available from Menu -> File -> Preferences -> Colors. If the model has more materials than the loaded color scheme, additional colors will be randomly generated.
- Get statistics this option calculates properties for objects that belong to the selected material. For more details, please refer to the Menu -> Models -> Model statistics... section
- Material to Selection use this option to copy objects of the selected material to the Selection layer with the following options:
- NEW (2D, Slice) generates a new Selection layer from the selected material for the currently shown slice. It creates a new layer that contains only the objects with the selected material for the current 2D slice
- ADD (2D, Slice) adds the selected material to the Selection layer for the currently shown slice. It adds the objects with the selected material to the existing Selection layer for the current 2D slice
- REMOVE (2D, Slice) removes the selected material from the Selection layer for the currently shown slice. It removes the objects with the selected material from the existing Selection layer for the current 2D slice
- NEW (3D, Stack) generates a new Selection layer from the selected material for the current 3D stack
- ADD (3D, Stack) adds the selected material to the Selection layer for the current 3D stack
- REMOVE (3D, Stack) removes the selected material from the Selection layer for the current 3D stack
- NEW (4D, Dataset) generates a new Selection layer from the selected material for the whole dataset
- ADD (4D, Dataset) adds the selected material to the Selection layer for the whole dataset
- REMOVE (4D, Dataset) removes the selected material from the Selection layer for the whole dataset
- Material to Mask allows you to copy the selected material to the Mask layer with options similar to the Material to Selection section above
- Mask to Material llows you to copy the Mask layer to the selected material with options similar to the Material to Selection section above
- Show as volume (MIB).. vallows you to visualize the selected material using MIB rendering. This feature is available for MATLAB R2018b and newer versions. By selecting this option, you can render the selected material as a volume, providing a three-dimensional representation of the material within the software
- Show isosurface (MATLAB)... allows you to visualize the model or only the selected material
(when [✓] Show selected material only is selected) as an isosurface.
This functionality is powered by MATLAB and the view3d
function written by Torsten Vogel. By selecting this option, you can view the model or selected material as an isosurface, which provides a three-dimensional representation of the material's surface
To interact with the rendered model or material, you can use the R shortcut to rotate and the Z shortcut to zoom. See more in the Render model...section - Show as volume (Fiji)... allows you to visualize the model or selected material (when [✓] Show selected material only is selected) using volume rendering with the Fiji 3D viewer. Please refer to the Microscopy Image Browser System Requirements Fiji for details
- Unlink material from Add to when unlinked, the Add to column is not changing its status during selection of Materials
- Column "Add to", this column defines the destination material for the Selection layer during the Add and Replace actions. By default, this field is linked to the selected material. However, it can be unlinked when the [✓] Fix selection to material checkbox is selected or when the [✓] Unlink material from Add to option is enabled
Additional options available via the context menu
Keyboard shortcuts
The Segmentation table also provides various shortcuts and options for selecting materials and working with layers. For example:
- The ^ Ctrl+A and Alt+A shortcuts can be used to highlight the selected material using the Selection layer. ^ Ctrl+A selects objects only on the shown slice, while Alt+A does that for the whole dataset. The selection is sensitive to the [✓] Fix selection to material and [✓] Masked area switches
- select the Mask entry in the table
- check the [✓] Fix selection to material checkbox
- select the second material in the Add to column
- Press the ^ Ctrl+A or Alt+A shortcut
Drag and drop models
- Model files with can be drag-and-dropped from a system file explorer application into the Segmentation table to be loaded as a new model.
- Annotation (*.ann) files can also be drag-and-dropped to the Segmentation table to be automatically opened
The [✓] Fix selection to material checkbox
The [✓] Fix selection to material checkbox ensures that all segmentation tools will only be applied to the material selected in the table. When this checkbox is selected, any segmentation operations performed will be limited to the specific material that has been chosen in the table. This can be useful when you want to focus on a specific material within an image and apply segmentation techniques only to that material.
The [✓] Masked area checkbox
The [✓] Masked area checkbox ensures that segmentation tools will be limited to the areas of the image that have been masked. When this checkbox is selected, any segmentation operations performed will only affect the areas of the image that have been designated as masked. This can be useful when you want to isolate certain regions of the image and apply segmentation techniques only within those areas
The [✓] "D" checkbox, to select fast access tools
The [✓] D checkbox is used to mark the favorite selection tools that can be accessed quickly using the D key shortcut. When this checkbox is selected, the chosen fast access tools will be highlighted with an orange background in the Selection type ▼ dropdown. This allows you to easily access and use your preferred selection tools without having to navigate through menus or options. You can select any tool as a favorite by checking the [✓] D checkbox next to it.
The Segmentation tools ▼ dropdown
The Segmentation tools ▼ dropdown provides a selection of different tools that can be used for segmentation. These tools are designed to help you separate and identify different regions or objects within an image, See more here.
Back to Index --> User Guide --> Panels