Selection Panel
Selection panel contatins tools for manipulation with the Selection layer. The Selection is one of three main segmentation layers (Model, Selection, Mask) which can be used in combibation with other layer. See more about segmentation layers in the Data layers of Microscopy Image Browser section.
Back to Index --> User Guide --> Panels
Contents
-
The A button -
The S button -
The R button -
The C button -
The F button -
The Erode button -
The Dilate button -
Color channel combo box -
The [✓] 3D checkbox -
The [✓] auto fill checkbox -
The [✓] adapt. checkbox -
The [✓] difference checkbox -
The Strel edit box -
Right mouse click opens a dropdown menu

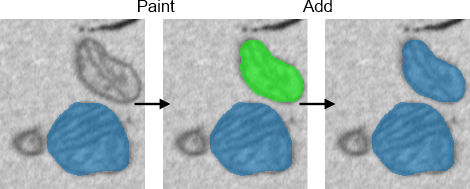
The A button
Press to add Selection layer to the selected Model or Mask layer, the destination layer is selected using Add to list box in the Segmentation panel.
Shortcuts
- A, do addition for the currently shown slice only
- ⇧ Shift + A, do addition for all slices of dataset
- ⇧ Shift+Alt + A, do addition for all slices of dataset including the time dimension
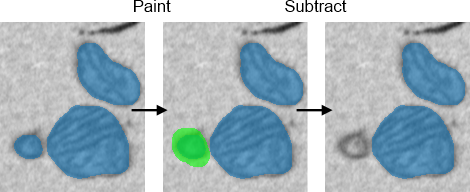
The S button
Press to subtract Selection layer from the selected Model or Mask layer, the layer for subtraction is selected using Add to list box in the Segmentation panel.
Possible useage combinations
| Select from | Add to | Fix Selection to Material | Masked area | Result of subtraction |
| Any | Mask | OFF | OFF | Mask - Selection |
| Nth Material | Mask | ON | OFF | Mask within selected material - Selection |
| Any | NOT Mask | OFF | OFF | All Materials - Selection |
| Nth Material | NOT Mask | ON | OFF | Selected material - Selection |
| Nth Material | NOT Mask | ON | ON | Selected material within the Mask - Selection |
Shortcuts
- S, do subtraction for the current slice only
- ⇧ Shift+S, do subtraction for all slices of the dataset
- ⇧ Shift+Alt+S', do subtraction for all slices of dataset including the time dimension
The R button
Press to replace the selected in the Add to list box material (that could be either marerial of the model or the Mask layer) with the contents of the Selection layer. The Add to list box is located in the Segmentation panel. Note! The Replace is sensitive to the state of the [✓] Masked area checkbox in the Segmentation panel.
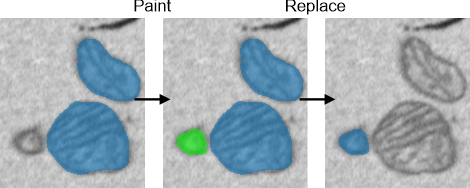
Shortcuts
- R, do replacement for the current slice only
- ⇧ Shift+R, do replacement for all slices of the dataset
- ⇧ Shift+Alt+R, do replacement for all slices of dataset including the time dimension
The C button
Press to clear the Selection layer.
![]()
Shortcuts
- C, clear the current slice only
- ⇧ Shift+C, clear
Selectionfor all slices of the dataset - ⇧ Shift+Alt+C, clear
Selectionfor all slices of dataset including the time dimension
The F button
Press to fill holes in the Selection layer. The operation can be triggered automatically when [✓] auto fill is checked.
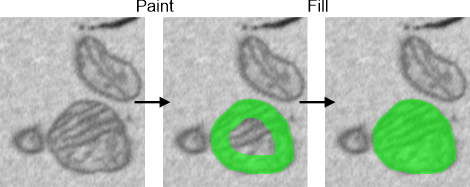
Shortcuts
- F, fill holes for the current slice only
- ⇧ Shift+F, fill holes for all slices of the dataset
- ⇧ Shift+Alt+F, fill holes for all slices of dataset including the time dimension
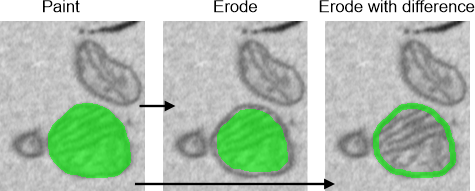
The Erode button
Press to perform binary erosion=shrinkage (imerode MATLAB function) of the Selection layer with the Strel size defined in the Strel edit box. The erotion works also in 3D, check the 3D check box. To get result as a difference between the current and the eroded selections check the [✓] difference checkbox.
Shortcuts
- Z, erode
Selectionfor the current slice only - ⇧ Shift+Z, erode
Selectionfor all slices of the dataset - ⇧ Shift+Alt+Z, erode
Selectionfor all slices of dataset including the time dimension
The Dilate button
Press to perform binary dilation (expansion) (imdilate MATLAB function) of the Selection layer with the Strel size defined in the Strel edit box. To dilate in 3D check the [✓] 3D checkbox in the Selection panel. To get result as a difference between the current and the dilated selections check the [✓] difference checkbox.
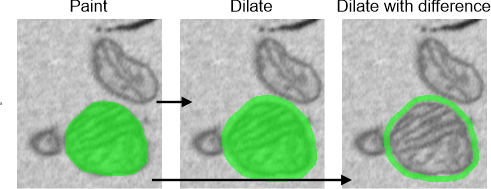
The dilation is also implemented in the Adaptive mode (switched ON with the [✓] Adapt checkbox), when the amount of expansion is limited by the image intensities in the expanded areas. The magnitude of the adaptation parameter is regulated with an edit box next to the Adapt. check box.
Shortcuts
- X, dilate
Selectionfor the current slice only - ⇧ Shift+X, dilate
Selectionfor all slices of the dataset - ⇧ Shift+Alt+X, dilate
Selectionfor all slices of dataset including the time dimension
Color channel combo box
This combo box defines the color channel that will be used for the selection with the tools in the Segmentation panel.
The [✓] 3D checkbox
Check it to do some of the image and Mask/Model manipulations in 3D.
The [✓] auto fill checkbox
Check it to fill shapes drawn using the brush tool (and eraser) automatically after release of the left mouse button
The [✓] adapt. checkbox
Select to perform adaptive dilation or selection of the supervoxels when using the Brush tool. When the shapes are dilated or supervoxels are selected the function calculates mean intensity values and standard deviation within the original shape. During dilation/brush only pixels that have intensities mean+-standard deviation multiplied with Adapt. coefficients are taken.
The [✓] difference checkbox
When checked the results of Erosion and Dilation will be the differences between existing and eroded/dilated Selection layers.
The Strel edit box
Defines size of the structural element that is used during erosion (the Erode button) and dilation (the Dilate button). The size of the Strel element can be specified as a single number or as two semi-colon separated numbers. For example entering [ 3; 5 ] defines size of the Strel element as XY = 3 x 5 pixels for 2D, or as 3 x 3 x 5 pixels for 3D.
Right mouse click opens a dropdown menu
When clicking on an empty area of within this panel an additiona menu appears allowing to hide/show the following panels. This allows to increase space occupied by the Image view panel

Back to Index --> User Guide --> Panels