Chopped Images
Back to MIB | User interface | Menu | File
Overview
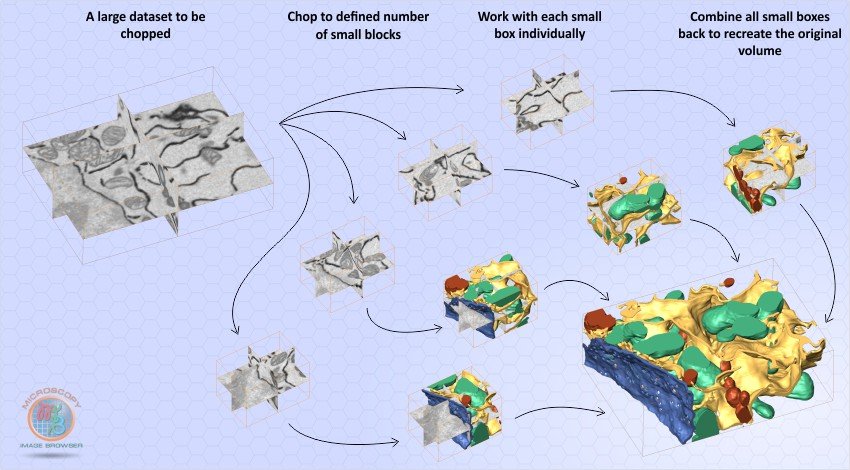
The Chopped Images tool in MIB allows you to split a large dataset into smaller pieces and later restore them. This feature is useful for parallel segmentation of large datasets across multiple workstations.
Chopped images -> Export
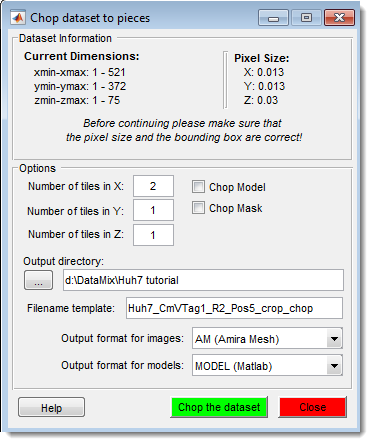
The Export command chops a large dataset into smaller pieces.
Settings
- Number of tiles in //: define the number of resulting datasets
Example
Setting X: 2, Y: 1, Z: 1 splits the dataset into two parts: [1:width/2] and [width/2:width], where width is the original dataset’s width.
- : when checked, chops the model layer into corresponding blocks.
- : when checked, chops the Mask layer into corresponding blocks.
- : specify the directory for saving chopped datasets (via button or text input).
- : sets the naming pattern; MIB appends
_Znn_Xnn_Ynn(e.g.,_Z01_X01_Y01) to each block’s filename, wherennis the block index. -
: choose from
- Amira Mesh
- NRRD
- 3D-TIF
- HDF5 with XML header
-
: options include MATLAB, Amira Mesh, NRRD, TIF, or HDF5; saved with a
Labels_prefix.
Masks are saved in MATLAB format with the template Mask_[FN].mask, where [FN] matches the corresponding image filename.
Chopped images -> Import
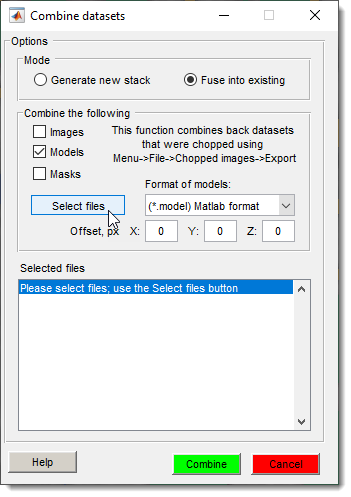
The Import command restores previously chopped dataset or fuse the cropped dataset into the currently open dataset.
Modes
| Mode | Description |
|---|---|
| Generate new stack | Combines images, models, or masks into a new stack. Requires filenames with _Znn_Xnn_Ynn tags for images and Labels_ prefixes for models (default for chopped exports). |
| Fuse into existing | Merges selected datasets into the current one using BoundingBox data from the ImageDescription field. Useful for cropped datasets; includes X/Y/Z offset fields (in pixels). |
Steps
- Choose a mode and select the types to combine (, , ).
- Press to pick files.
Filename Generation
- Image:
Huh7_CmVTag1_R2_Pos5_crop_chop_Z01-X01-Y01.am - Model:
Labels_Huh7_CmVTag1_R2_Pos5_crop_chop_Z01-X01-Y01.model - Mask:
Mask_Huh7_CmVTag1_R2_Pos5_crop_chop_Z01-X01-Y01.mask
Important!
If is checked, select only image files (not models or masks); filenames for models/masks are auto-generated. For importing models/masks into an open dataset (without ), select the actual model/mask files.
Usage Tips
Parallel Segmentation
To segment a large dataset across workstations:
- Export with desired tiles (e.g., X: 2, Y: 2, Z: 1).
- Process each chunk independently.
- Import with Generate new stack to recombine.
Offset Adjustment
Use Fuse into existing with X/Y/Z offsets to align cropped datasets that don’t match the default BoundingBox.
Back to MIB | User interface | Menu | File